Are you intimidated by the idea of contouring? Maybe you’re afraid that contouring will leave your face with lots of dark, streaky lines across it, or that it will just increase the amount of time it takes you to get ready each morning. Well, I’m here to tell you that contouring is so easy and fast! Let me show you the right way to contour your face in just four easy steps.
What is Contouring?
First things first: What is contouring, and why should you do it? Contouring is a makeup technique that defines the natural shadows of your face, creating more depth and dimension for a more sculpted look. Traditional makeup is designed to leave your face flat and one dimensional. Nobody wants that! Seint makeup is designed to do the opposite! Seint IIID Foundation is specifically designed to enhance the natural beauty of your face. If you want a Seint IIID Foundation tutorial, check out these tutorials HERE and HERE. But today, we’re just going to focus on the right way to contour your face.
Step 1: How to Choose the Right Contour Shade for Your Face
The very first step in contouring is choosing the right shade. You want to choose a shade that is darker than your natural skin tone and that is more ashy in nature. A common mistake a lot of people make when contouring is using their bronzer as a contour. But this will not create the effect you are going for.
To contour properly, you need to use a color that is more ashy in tone. Bronzers, however, tend to have a lot more warmth to them, meaning they have yellow and gold undertones. Because bronzer is used to try and mimic a sun-kissed glow, the yellow and gold tones are what create that beautifully bronzed finish. But that is not what we are trying to create when contouring. Contour is meant to mimic the natural shadows that fall on your face. Thus, a more ashy and cool tone is necessary for proper contouring.
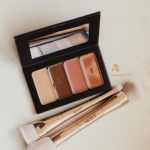
Seint Contour has so many contour colors to choose from. If you need help figuring out the perfect shade for you, be sure to connect with me so I can help get you color matched!
Take the Seint Color Match Quiz Now!
Step 2: What Brush to Use to Apply Contour the Right Way
Next, it’s important to have good tools to apply your contour with. I absolutely love the Seint Buff Brush. It’s so versatile. All of Seint’s brushes are double ended, and the smaller end of the Buff Brush is perfect for contouring your face the right way. The Seint bristles are specially designed for working with Seint’s cream-based makeup, and the Buff Brush is just the right size for flawless contouring. And bonus, you can use the Buff Brush to apply the rest of your makeup as well!
But my absolute favorite brush for contouring is the Detail Brush. This brush is a little smaller than the Buff Brush, but is also double ended. The large, flat end of the Detail Brush hugs up perfectly to the contour spaces of your face, giving you the perfect sculpted look every time!
If you’re low on time or feel intimidated using these brushes, you can also apply your contour color with just your fingers. I have tutorials HERE and HERE to show you the right way to contour your face using mostly your fingers!
Step 3: Where to Apply Contour
The first place you’ll want to apply your contour is underneath your cheekbones. Make sure you’re using your brush to hug the contour line right up against the cheekbone and then slightly brush the color upward. Next, run your brush just underneath your jawline. This will help chisel out your jawline for a more sculpted profile. Be sure to apply this contour on both sides of your face.
After that, you’ll apply your contour across your forehead along your hairline. This helps to provide a little more depth to the top of your face. If you have any contour color left on your brush, apply a little line of contour just beneath your lower lip. This enhances your bottom lip just a tad, giving you a natural, but fuller, pout.
The last place you can put some contour is down the sides of your nose. I like to use the Smudge Brush for this. But your pinky finger also works great. Just place a little contour down both sides of your nose. Then connect the two lines together at the tip of your nose to bring the contour together.
Step 4: Blend, Blend, Blend!
One of the great things about Seint’s Contour, is that it is actually part of the IIID Foundation system and provides coverage all on its own. This means it can be applied directly to your skin — no need to layer it on top of anything else!
After you’ve applied your contour, you’ll finish applying the rest of your IIID foundation. And then it will be time to blend it all out. Using your brush (the Blush and Bronzer Brush is my personal favorite to blend with), gently buff any harsh lines and allow the creams to marry into one another. When you’re blending your cheekbones, be sure that you move the color in an upward direction. This will help your cheekbones pop off your face even more. Also, make sure you use a light hand when blending so that you do not overblend and make all of your contour disappear.
Because Seint makeup is cream-based, it blends like a dream! It is also incredibly forgiving. So don’t worry about messing it up! You’ll be amazed at how the contour lines just melt right into your face, without feeling heavy or cakey. When you’re done blending, you won’t see any streaky lines, just perfectly sculpted features!
And that’s it!! Isn’t it so easy?!? I promise, once you get the hang of the right way to contour your face, it will just become second nature. In mere minutes, you’ll have a perfectly contoured face every morning!
If you’re not sure what contour colors you should use, take this quiz to find out or send me a picture! I love to help women find their perfect colors!
